Social sharing buttons floating bar

Share posts on Facebook, Twitter, Google+, LinkedIn, Pinterest and to many other sites.

This widget will the option for your visitors to share your posts on their social network. The widget has button for all popular social bookmarking websites. The widget is floating sidebar with the buttons of Facebook, Twitter, Google+, LinkedIN, Pinterest, StumbleUpon and Reddit by default. You can also add Technorati by adding 'technorati' in script. See the post 'How social bookmarking can help you?'

Follow the below steps to install the widget:
1. Login your Blogger account and go to your blog.
2, Now go to the 'Layout' from dashboard.
3. Open any HTML/Javascript widget if you have already added some
OR if you don't have added any HTML/JavaScript widget
Add a gadget/widget in the sidebar.

4. And chose HTML/JavaScript
5. Now copy the following code:

6. Paste the code in the HTML?JavaScript widget and click save
7. Everything is done and you can now easily share your post to all the networks and your visitors can also share the posts.

 You can preview the widget in action by clicking on the below button:

How to create video tutorials?

screencast-o-matic can be used to create video tutorials
Everyone want to make their technology website or blog more professional with video tutorials. But when it comes to 'How?' you will search a software that may help you. If you don't come to a software that can you help you then this post will help you with the software.
Screencast-O-Matic is the best free software I found on the web for recording your computer screen, audio from microphone, notes and from webcam. Best thing is that the software can create high quality videos and both free and paid versions are available. There is no watermark or advertisement in videos created by Screencast-O-Matic even in the free version.

Limitations of free version: You can keep only one video to be edited in the software. Don't get confuse with the production of software because software can produce unlimited videos for free but you can only keep a single video to be edited, for example, you can add notes etc. There are no more limitations in the free version. You can click 'Done with the video' to create more videos.

Features:
High quality videos.
Options of video size: HD, fullscreen and many.
We can show or hide mouse clicks, mouse cursor.
We can add notes.
We can pause recording.
The software is very easy to use and you will master it in very soon.
You can upgrade to paid version with lot of more features.

Tips:
You can create a channel on YouTube and upload your video tutorials to that.
Give link to your related post in the video and in the description on YouTube. This will help you increase visitors on your website.
Don't forget to embed the video in the related post.

Social bookmarking to increase website visitors

How to have more visitors by social bookmarking
Want visitors instantly for your new blog or website? If yes then social bookmarking is a way to increase your visitors. For example if you had more than 500 friends on Facebook and no visitors on your blog or website then you should not wait to make use of your Facebook friends to increase your traffic. Being genuine we don't think that social bookmarking is the way that will increase your blog or website's page rank many times but it only helps you to increase the visits. You should know all the following things to increase your web traffic with the help of social bookmarking/sharing:

What is social bookmarking: Social bookmarking is to share your posts URL on the social sharing sites (e.g. Facebook, Google+, Yahoo etc.). If you are a blogger, then you must have seen sharing buttons below the posts of your blog or if not then someone other's blog. If you don't have these buttons on your blog's post then this post "Social sharing buttons floating bar" can help you.

Why social bookmarking: Your website is on web but how you will your friend's or people that you have a website. Social bookmarking even increases the web traffic to your website if your blog doesn't come in big G's (Google) search.

How to social bookmark: You can social bookmark by just clicking social share buttons if your blog has social sharing buttons widget if you don't have you can install or you can manually social bookmark by going to the social bookmarking website and posting the URL/link of the post/page you want to share. For example, in Facebook you can update your status by the link or in Twitter you can tweet the link.

Websites for social bookmarking:
There are number of websites for social sharing. But the 95% people are not going to visit any website other than Facebook, Twitter, Google+ or hardly Pinterest or LinkedIN. We suggest you to only share on Facebook, Twitter and Google+. Don't waste your time on other websites. Use that time in posting quality content on your website that we have experienced on TechiMen. 

Tips:
You should make the title of share attracting and short but genuine
You should ask your friend's to share the link
You should ask your friend's  to retweet (on Twitter)
You should create page on Facebook, Google+ and Twitter
Your pages should be professional. These posts may help you 'How to design Facebook cover page?', 'How to design Twitter cover or header?' These posts have the layouts that may help you designing your pages on Twitter and Facebook.
You can also create a channel on Youtube. You videos can advertise your blog or website. You can create tutorials (See this post 'How to create video tutorials') if you have a website similar to TechiMen.

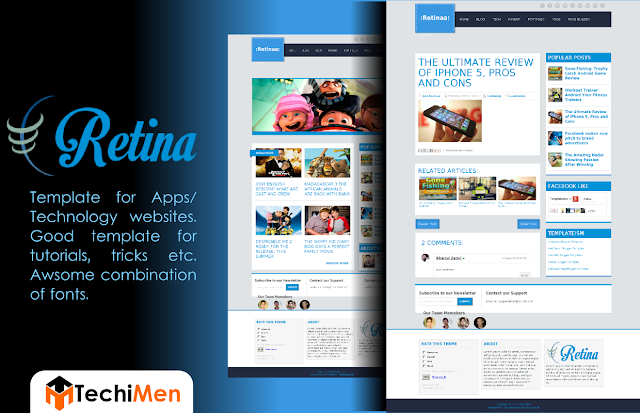
Retina: A template for technology websites/blogs

Retina is free premium template by Templateism sponsored on TechiMen
Name of Blogger Template: Retina
For: Websites or Blogs about technology, tutorials, geeks, tutorials, gadgets, apps et cetera.
By: Templateism
Published: June, 2013


Description: Retina template suits every blog. If it is personal, about geeks, technology, games, softwares, information, SEO, illustration or anything. Retina template is perfect with its blue colored superb fonts. Retina template is premium and is free for download by Templateism. The template has many categories to show posts on the homepage of your blog and your blog's home page look fantastic and static page. Your blog or website becomes professional. The most of the leading tech websites uses the similar templates. The template has great footer. The template shows the team members of the blog/website. The widgets above footer are really good. Everything is perfect.

Things to remember: You should fix the number of characters of the post titles in your brain because if you post the posts with different length of titles then at the homepage of your blogger home, the posts in two columns will not look great.

How to setup:
Posts: you should upload images with ratio of Width:Height 14:9 (e.g. 280X180 or 1400X900) for best results on homepage.

Featured posts (Technology, Sports, etc.): To feature posts in technology or sports on home page just label the posts with respective label. E.g. if you want to feature a post under technology label that 'Technology'. If you want to edit the featured categories you can do that by going to your blogger account > your blog > Template > Edit HTML. Then find by pressing Ctrl+F and typing the name/label of categories there and replacing with your own category.

Automatically convert all Rs. to Rupee symbol

How to change rs to rupee symbol automatically
Want to use Rupee symbol instead of Rs. or Rs on your blog or website? Here is the method to do so. Rupee symbol is now very common to be used on websites and blogs. The complex method is that you put an image of Rupee symbol before every amount in Rupees. Sometime you will forget to put the image and sometime you will be lazy to do so. But we have a very simple method to do so by using a JavaScript being provided by WebRupee. You can also avail this service on your Blogger's blog. Even it is simpler to be installed on Blogger.

Steps:
1. Go to </body> section of your webpage's HTML code.
2. Copy the following script from here and paste before </body> of your page's HTML

3. Done. Now all the Rs. and Rs will be changed to Rupee Symbol. Even in the new post you just have to type Rs or Rs. before the amount and the JavaScript will automatically convert the text into Rupee symbol.

For 'Blogger' bloggers:
Steps:
1. Go to Blogger and login.
2. Now go to your blog and select 'Template' from dashboard.
3. Click on 'Edit HTML'
4. Find </body> (You can do this by pressing Ctrl+F and typing </body>)
5. Now copy the following script from here and paste before </body>

6. Done. Now all the Rs. and Rs will be changed to Rupee symbol automatically in every post of your blog.

If you are facing any problem installing the Rupee symbol on your blog, just feel free to comment.

How to install a template on Blogger?

How to install a template on blogger downloaded from a website other than blogger
Are you bored with Blogger's own default template or theme and want to install an awesome template for your Blogger's blog. Actually Blogger support third-party templates to be installed on your Blogger's blog beside the Blogger's own default templates.  For example, TechiMen is also powered by Blogger but we don't use Blogger's Template. So you can also use any template you want to install on your blog.
There was a time when people said that there are not good templates for Blogger's blog like Wordpress have. But now these are only excuses. Actually these people are lazy because they are not updating their Blogger Template with an awesome looking template from free template providing websites like bTemplates, Templateism, etc. (see the full list of such websites -under updation)
So follow the following steps, and you will be able to install the template you want to.

Steps:
1. Download a Blogger template from a template providing website like bTemplates, Templateism, etc.
2. Now find the .xml file you downloaded. If you you have downloaded a zip file then extract that and find the .xml file.
3. Go to Blogger, login and go to your blog
4. Now click on 'Template' from dashboard.

5. Then click on 'Backup/Restore'
6. Now click on 'Choose File'
7. Now select the .xml file from your computer.
8. Click on 'Upload'
9. Done. Now you can customize your template by clicking on 'Edit HTML'

Flying Twitter bird on your Blogger blog

Want to make your blog readers wonder when they see a Twitter bird flying on your blog. Actually this Twitter bird flies when someone scroll your page down. It sits anywhere on your page. When you hover the bird with mouse you have two options: 'tweet this' and 'follow me'. The Twitter bird make your readers to easily follow you or share your post on Twitter in a creative and lovely way. So why are you waiting just follow the below steps and you will be able to put the Twitter bird on your blog.


Steps:
1. Go to Blogger, Sign in and go to your blog.
2. Go to 'Template' from dashboard
3. Click on 'Edit HTML'
4. Find </body> in the HTML (You can do this by pressing Ctrl+F and typing </body>)
5. Now copy the code below from here and paste the code just above </body> in your template's HTML
6. Replace TechiMen with your Twitter username.
7. Now click on 'Save'. (NOTE: If the HTML is not being saved. Then make the code friendly by using 'Postable Service'. You can post the code there and click 'make it friendly'. Then copy the code from there and use. Now the HTML will be saved)

Videoism: A template for video blogs


Name of the Blogger Template: Videoism
For: Video Blogs or Video Hosting Websites
Published: July, 2013
            

Description: The template is for video portals or blogs. We tested the template on Google Chrome and the template worked well after setting it up. The template is SEO friendly and has many features that a video portal should have like video counter, featured videos etc. Basically the template's theme is sky blue font on white background (However you can customize the font colors by going to 'Edit HTML' in Template section on your blog's dashboard).

How to setup: Before you setup the template you have to install the template (click here to check how?) to your Blogger's blog.
1. Posts: To embed video use the following way, because if you try other way to embed the videos, then may be the video's thumbnails do not work on the home page of your video blog/portal.


2. Featured Videos Widget: To add this widget you have to go to Blogger > Your Blog > Layout> Add Widget > HTML/JavaScript. Now paste the following code there in the widget and click 'Save'

Label 'Feature' those posts of videos you want to feature. You can also customize this to your choice.

We hope that you will enjoy the post. Comment if you are facing problems using this template.

Stop copying content from your blog or website

Want to stop people copying content or text from your blog or website.
This is the easiest way to stop people from copying your content.
Tired of copycat bloggers, who copy your content and post your content on their blog. Then we have solution for you and this is really easy to do.
Today we have a trick to beat the copycat people who steal your content and increase their traffic and you got nothing for your creativity. Isn't it irritating? Yes it is. Because I feel this myself when I search my post on Google and that takes me to a blog which has exactly same content that I have posted on TechiMen.
Let us come to the topic that 'How to stop people from copying text or content?'
Steps:
1. Copy the following code


2. Now paste this in HTML of your website
3. Done. Now the code should work.

For Blogger Users:
Steps:
1. Log in your Blogger account
2. Go to your Blog's dashboard
3. Go to 'Layout'
4. Now create new widget and select 'HTML/JavaScript' or select any of your existing 'HTML/JavaScript' widget (Example Facebook Likebox).
5. Now paste the above code there. Save the widget
6. Done. It will work absolutely.

If you have more ideas about blocking the content copying then comment.

Remove/add 'Date' and 'Posted by' from posts

Want to remove or add 'Date' from your Blogger posts
Here is the answer of 'How to remove or add' 'Posted by AuthorName' and Date from your posts.
  1. First log in your Blogger Blog
  2. Then open 'Layout' from dashboard
  3. Now click 'Edit' in 'Blog Posts' widget
  4. Select options you want to show and what do you want not to show
  5. Done. Very simple. Isn't it? Comment.

If it doesn't works. Then comment below. I will try my best to resolve your problem.


HOME      CONTACT      ABOUT      SUBMIT


Blog by Dev Baisoya | Proudly powered and hosted by Blogger